| View previous topic :: View next topic |
| Author |
Message |
Colin T
Joined: 13 May 2007
Posts: 1282
Location: N.E. Hampshire
|
 Posted: Fri Jun 18, 2010 3:53 pm Post subject: Posted: Fri Jun 18, 2010 3:53 pm Post subject: |
 |
|
Yes - you can use both, which is handy.
Unfortunately my radiator can only use the off-set connector type, unless I start modifying it, which I might do.
_________________
Hell has frozen over...... the car formally known as 'Heap' is back on the road! |
|
| Back to top |
|
 |
Colin T
Joined: 13 May 2007
Posts: 1282
Location: N.E. Hampshire
|
| Posted: Tue Jun 22, 2010 10:32 pm Post subject: |
|
|
My radiator originally held the switch in with a split-pin through a metal clip, which itself was retained by the sealing bush for the switch (a deeper type of bush than most). This system really meant the sealing bush was holding the switch in place, which in my thinking is not very good.
As I can't get the off-set connector type switch, I decided to ditch the original fixing method. I have used the method as per S1 &S2 cars, with the switch in a shallower bush, retained with a metal clamp on the outside. the clips for the clamp were too long to clip over the end cap of the radiator, as my radiator is a different type so I used garden wire:

I ran the engine until the fan had come on and off a couple of times. I then had to make a trip, collecting some friends too (this was about 2 hours later - I cut it slightly fine but there was plenty of time to spare!). After a 7 mile run with the engine hotish at the end (due to awkward parking), there was a leak!!
Only a little bit of coolant leaked from around the switch, despite me having put a bit of sealant on it (stuff like Hylomar), probably happened when the coolant got hot after turning the engine off, stopping the cooling of the water. I drove back and no more leaks.
What should I do about this slight leak? I think that the end cap of the radiator is not quite flat, like it has had a slight trauma in the past. I am thinking of trying the bend the end cap so that it is as flat as possible around the switch hole, plus putting some more (more suitable?) sealant on the bush. Any thoughts on this idea or type of sealant to use? Any help greatly appreciated, I have to drive to Norfolk and back on Saturday for a wedding!!
_________________
Hell has frozen over...... the car formally known as 'Heap' is back on the road! |
|
| Back to top |
|
|
Mike Dean
Joined: 01 May 2007
Posts: 455
Location: North London
|
| Posted: Wed Jun 23, 2010 11:21 am Post subject: |
|
|
My friend was complaining of a persistent leak from his radiator fan switch also, and had just received an upgrade to fix it. He has Kenlow fans fitted to a Sunbeam Alpine. At first I thought the "fix" might be applicable to your Allegro, but having seen it I realise it is not, but I 'll mention it just as something that may be of interest.
The Alpine did not originally have electric fans, so there is no place to mount a switch on the radiator. Instead the sensor is inserted into the radiator and the wire is fed out under the water hose:
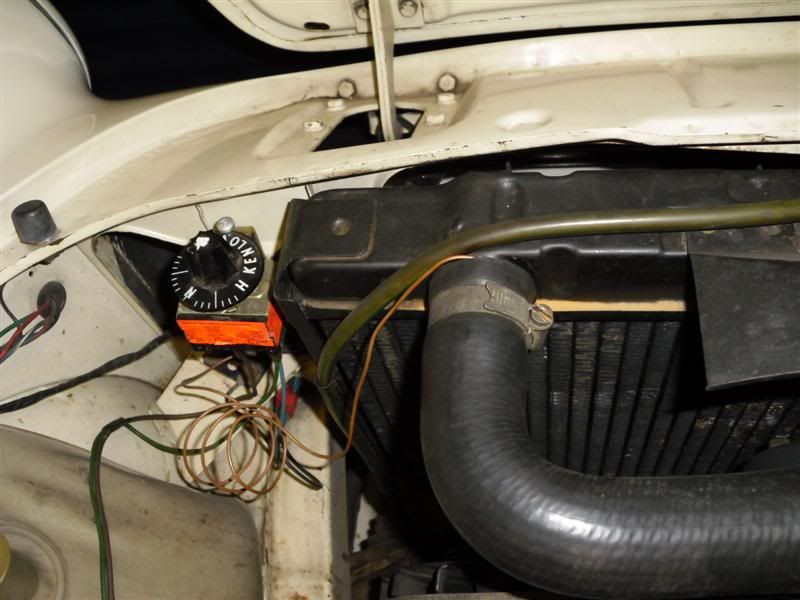
Unfortunately, the hose does not form a tight seal over the wire and so there is a persistent drip.
The fix is a short silicone hose with a groove in which the wire will run.
What may be of interest is that the immersed switch has been superceded by a long thin thermocouple which is slid between the "vanes" of the radiator.
Mike. |
|
| Back to top |
|
|
Colin T
Joined: 13 May 2007
Posts: 1282
Location: N.E. Hampshire
|
| Posted: Thu Jun 24, 2010 10:27 pm Post subject: |
|
|
Interesting 'switch' - I resealed mine but then found that the leak was due to having slackened the top hose and not tightened it. I drove it 25 odd miles that!
However, by removing and resealing the new switch, I have somehow broken it, which I don't understand. And I can't complain because the seller refunded my money as the switch was different to the picture on the listing and let me keep it for free!
I'll have to see if the Motor Factor kept the one they ordered for me at £20. Urgh......
_________________
Hell has frozen over...... the car formally known as 'Heap' is back on the road!
Last edited by Colin T on Sun Jun 27, 2010 9:32 pm; edited 1 time in total |
|
| Back to top |
|
|
Mike Dean
Joined: 01 May 2007
Posts: 455
Location: North London
|
| Posted: Fri Jun 25, 2010 8:23 am Post subject: |
|
|
| Colin T wrote: | | Interesting 'switch' |
Yes. To be precise it's a thermocouple, the actual switch is in the control unit mounted to the left of the radiator. The knob allows for adjustment of the trigger temperature setting.
Mike. |
|
| Back to top |
|
|
Dave Tong
Joined: 07 Mar 2010
Posts: 44
Location: York
|
| Posted: Sat Jul 17, 2010 9:02 am Post subject: |
|
|
Hello Colin
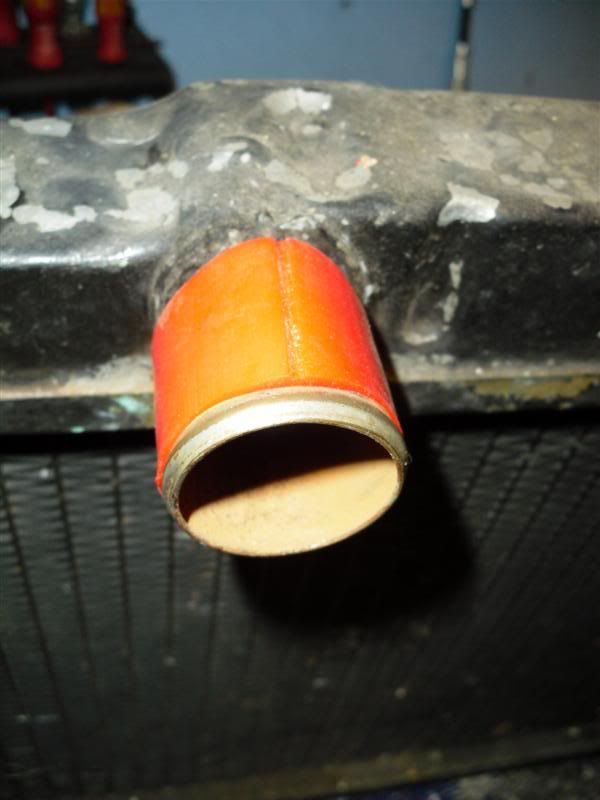
Its nice to know Im not alone with these sorts of problems. I've been trying to sort the fan switch in my series 3 (81) 1.5 in the last week or so. It has the rad with the switch held by a split pin. I used a different method to yours which I thought you may be interested in.
I could only get the non offset switch and I found that the connectors would still clear the pin and fit. To get around the seal holding the switch in the rad (which I totally agree is not a good idea) I soldered the clip to the tank and then pushed the seal in. Braising would be stronger but I had already had the radiator re-cored and the higher temp required might have melted the solder holding the rad tubes in place. I've had to re use the old seal as I could only get the shallow seal. See pic. Does anyone know where I can get the deeper seal?
As to the question of what is a good sealant to use? Ive used high temperature red silicone with the old seal. This is easily available from my local motor factors and Ive used it several times in the past with good results. The key is to give it time to go off and set.
Dave
http://www.flickr.com/photos/48226304@N04/4801474348/
[/img] |
|
| Back to top |
|
|
Colin T
Joined: 13 May 2007
Posts: 1282
Location: N.E. Hampshire
|
| Posted: Sat Jul 17, 2010 12:27 pm Post subject: |
|
|
Good idea with soldering the retaining clip in place. I did think that the spilt pin's legs could be bent around the non-offset switch, but as my deeper seal was quite knackered I had to use the other method with the swallower seal. Even with that I sealed it in place (which may have worked with my knackered seal) using Loctite Premium sealant from Halfords - it did such a good job that when I needed to remove the dead replacement switch it was quite a fight to prise it out, being held and effectively glued in place by the sealant.
I tried to find the deeper seal to buy but totally failed, autojumble might be the best bet?
_________________
Hell has frozen over...... the car formally known as 'Heap' is back on the road! |
|
| Back to top |
|
|
|

